
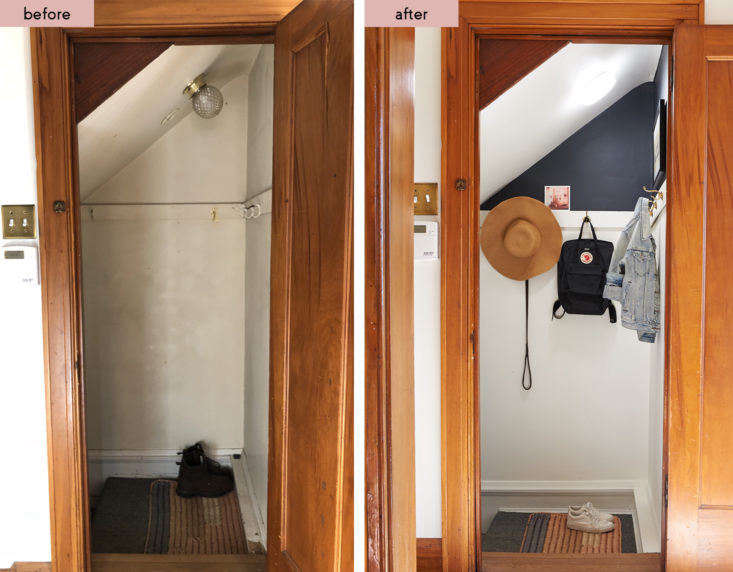
I’ve been focusing my home-improvement efforts on specific rooms. The kitchen was the first room we overhauled when we moved in, then the foyer. And next up? Well, it was going to be the powder room, but this transformative makeover by Emily Cosnotti, of the blog The Sweet Beast, may just convince me to remodel not a room this time but an area in my home I’ve neglected: the top of the stairs to the basement. It’s an especially glaring blunder as the landing is just off our new kitchen, in plain sight.
For Cosnotti, the basement stairway was a space they had to pass through at least twice on most days: To get to the garage, they had to use the stairs. “It begins and ends our days, and yet it was a depressing afterthought,” she writes.
No longer. She and her husband finally decided to tackle the heavily trafficked but overlooked area. Armed with new hooks and a new light (all totaling less than $80) and leftover paint and supplies they had from previous projects (free!), they were able to completely transform the space from an eyesore into a hard-working and attractive entryway. Here’s how they did it.
Photography courtesy of The Sweet Beast.
Supplies:
- Krud Kutter Prepaint Cleaner; $9 on Amazon
- Rust-Oleum Ready Patch; $8.48 a quart on Amazon
- Dap Alex Fast Dry Painter’s Caulk; $9.99 on Amazon
- Benjamin Moore’s Raccoon Fur paint
- Benjamin Moore’s Simply White paint
- 5 Classic Solid Brass Coat Hooks; $11.09 each at House of Antique Hardware
- LED Flushmount Light Fixture; $19.97 at Home Depot
Step 1: Clean and patch.
After removing the hardware, give the walls a good scrubbing. Cosnotti used Krud Kutter Prepaint Cleaner to remove the grime. Then fill in any holes or cracks in the walls with Rust-Oleum Ready Patch.

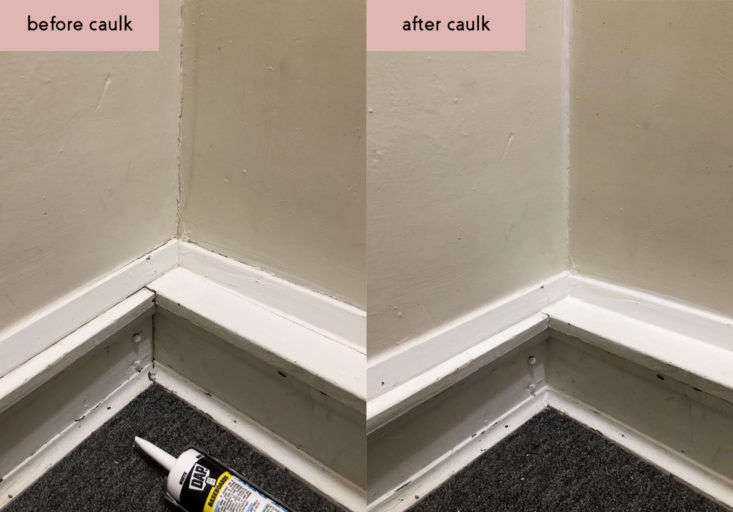
Step 2: Caulk cracks in corners and trim.
When older homes settle, cracks appear, often in the corners and molding. Smooth them out with painter’s caulk. It takes about 20 to 30 minutes to dry.
Step 3: Paint.
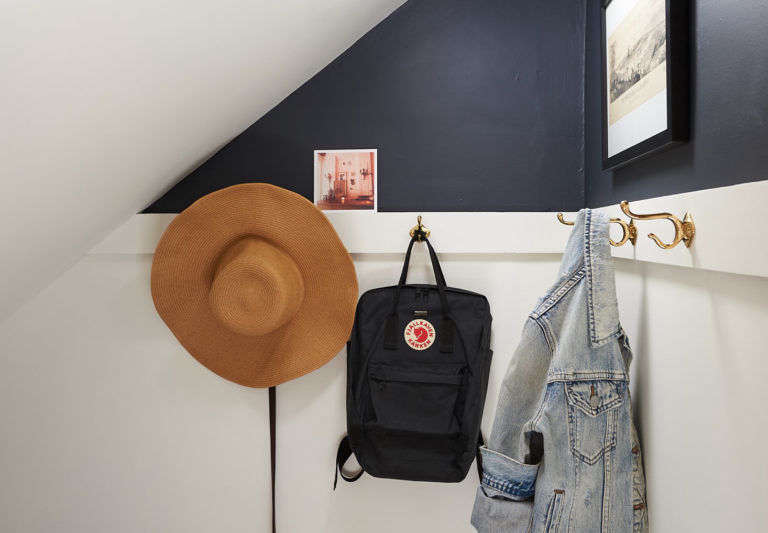
Consider bringing in colors from the rest of your home for a cohesive feel. Cosnotti used a white that’s the color of her bedroom walls and a dark paint above it that’s the color of her living room walls.


Step 5: Install lighting, hooks, and art.
Treat this space like you would any other room in your home, which is to say, personalize it with art.


To see more images from Cosnotti’s DIY makeover, click here.
And be sure to check out more DIY projects on our site:
Products in this Post:
-
Krud Kutter PC32 Prepaint Cleaner
$9 USD from Amazon
-
Rust-Oleum 4424 Ready Patch Metal
$8.48 USD from Amazon
-
DAP Alex Fast Dry Painter’s Caulk
$9.99 USD from Amazon
-
Raccoon Fur Paint
$67.99 USD from Benjamin Moore
-
Simply White Paint
$67.99 USD from Benjamin Moore
-
Classic Solid Brass Coat Hook
$11.09 USD from House of Antique Hardware
-
LED Flushmount Light Fixture
$19.97 USD from The Home Depot


Have a Question or Comment About This Post?
Start the Conversation