

Back when Tara and Percy of Jersey Ice Cream Co. redid my kitchen on a dime (See Rehab Diary: Dream Kitchen for Under $3,000), we determined that tackling the floor was beyond both our budget and timeframe. So we minimized its dark visage with striped Swedish rag rugs.
Cut to me washing them every week (or rather, not washing the heavy cotton behemoths even though they were desperately in need). Turns out that the area between the stove and sink is not the best place for a rug. Clearly I had to find another, more cleaning-friendly way to cover up my floors.
Then I remembered the homemade canvas floorcloths that my husband and I had admired in an artist’s studio some 20 years ago. I decided to try making my own.
Photography by Justine Hand for Remodelista.

Materials
- Heavy-duty cotton canvas. No. 10 (14 oz) Extra-Heavy Cotton Canvas is available at Blick for $17 per yard. To save time, you can also do as I did and buy pre-primed canvas, such as Blick Studio Acrylic Primed Cotton Canvas; $13.25 for one 72-inch-wide yard. (To make a three-by-seven-foot rug, I purchased three yards of Blick pre-primed canvas.)
- Acrylic primer or gesso (if you don’t buy a pre-primed canvas). Note: The leftover latex primer you have at home may work. But many are a mix of acrylic and vinyl; 100 percent acrylics offer more water resistance and stain protection. Frederix Premium Gesso is available at Blick; $16.31 per quart.
- Paint roller and tray (if applying your own primer)
- Liquid acrylic paints (color of your choice). Again you can use leftover latex paint. I used Blick Artist Acrylics in Warm Gray.
- Polycrylic Varnish. Minwax Polycrylic Varnish in Satin is available on Amazon for $18 per quart.
- Double-sided carpet tape. Roberts Indoor/Outdoor Three-Inch Double-Sided Carpet Tape Roll is available at Home Depot; $5 for 15 feet.
- Several different sized paint brushes
- Painter’s tape
- T-square and a measuring tape or yardstick
- Heavy duty scissors
- Pencil
- Sharpie
- Lightweight sandpaper
- Staple gun or tacks (optional)
Instructions

Step 1: The beauty of making your own floorcloth is you can customize it to fit your space. After figuring out the size of rug you want, measure and mark the perimeter in pencil on your canvas. Then add three inches more on each side. (These extra edges will be folded under later.)

Step 2: Once you have your measurements, cut the canvas to desired size, remembering to include the extra several inches on each side.

Step 3: Using either tacks, a staple gun, or heavy-duty tape, firmly secure your canvas to your work surface so that the edges won’t slip while you paint. (You can use a piece of plywood or the floor. If the latter, you may want to put a piece of plastic under it.) Then, if you did not purchase pre-primed canvas, apply one coat of primer over the entire surface of your cloth. Allow to dry.

Step 4: Another advantage of a DIY floorcloth is that you can customize your pattern. Stencils work great, but I wanted a Swedish rag rug look. Using several online images as inspiration, I devised my own striped design. If you’re working with an irregular or alternating pattern as I was, I highly recommend that you map it out on a piece of graph paper before attempting to lay it out on your canvas.

Step 5: Using your yardstick or tape measure, determine the center of your cloth. Using your T-square to insure a straight line, begin to tape out your striped pattern.

Above: As my pattern progressed, I quickly realized that I was creating a rather dizzying array of stripes. To ensure that I didn’t make any mistakes as I went along, I also drew arrows to indicate which taped areas should be painted and which should be left blank.
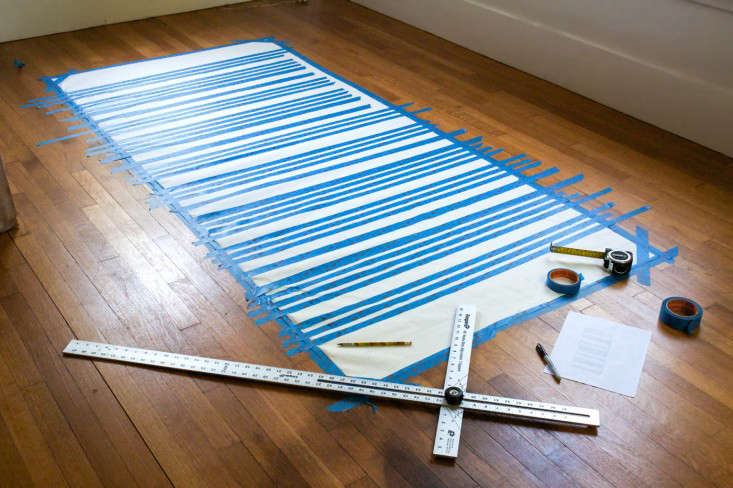
Above: My canvas all taped and ready for paint.

Step 6: Using a fairly stiff brush, paint in between your tape. Allow to dry. It may be necessary to apply a second coat.

Step 7: Once your paint is dry, remove the tape. Perform any touch ups with your primer.

Step 8: Apply two coats of varnish with a synthetic fiber brush. If necessary, lightly sand in between each coat.

Step 9: Cut your double-sided carpet tape to the width of one end of the finished cloth. Lay at one end.

Step 10: Fold your edge and secure by pressing down. Trim the corner. Repeat steps 9 and 10 on all four sides. If you have the means and skill, then a sewn edge would be even more secure and would add extra design flare.
Finished Look

Above: A detail of my completed Swedish striped floorcloth in situ.

Above: The acid test: blueberries. With the help of Bunzo, our rabbit, I tested the new cloth’s ease of cleaning. Happily, residual berry juice came right up with the wipe of a sponge. (Note: Your floor cloth may look a bit wrinkly at first, as mine did, but it will settle and lie smoothly after a few days.)

Above: Another perfect locale for a waterproof cloth: the front porch.
Want more easy rug DIYs (and rug alternatives)? See:
- DIY: New England Spatter-Painted Floors
- DIY: Crocheted Muslin Rag Rug
- Rugs Outlined with White Tape
- DIY: Dramatic Floor Stencils


Have a Question or Comment About This Post?
Start the Conversation